
Creating VST Plugins
One of SynthEdit’s most powerful features is the ability to export your projects as standalone VST3 plugins. These plugins work in any DAW that supports the VST3 format.
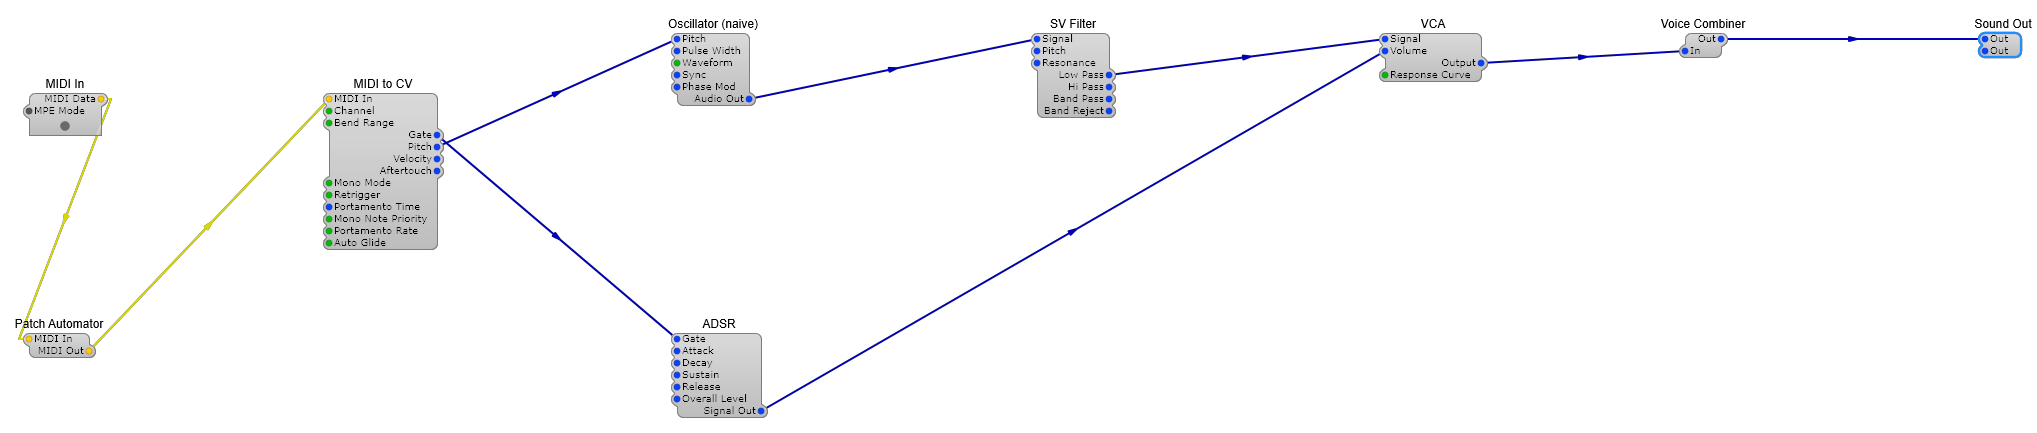
This is the inside of a plugin-ready container: MIDI arrives on the left, audio leaves on the right, and a MIDI-CV 2 in between turns notes into the pitch and gate that drive the voice. That’s the whole shape of a VST instrument — Your First Synth builds exactly this patch step by step.
Designing the GUI
Section titled “Designing the GUI”Before exporting, you’ll want to create a user interface for your plugin:
- Switch to the Panel view
- Add controls — knobs, sliders, switches, labels
- Connect controls to module parameters
- Customize the appearance with colors, images, and layout
The panel’s size becomes the plugin window’s size. If you want the user to be able to scale that window up or down inside the DAW, see Resizable Plugin Windows.
What the export needs
Section titled “What the export needs”Export works on a container, not on a loose patch, and it is strict about finding exactly one to export. Before you reach for the menu:
- Your synth must sit inside a container, with Don’t Export unticked
- That must be the only exportable container at the top level. A Slider2 or Knob2 dropped onto the master canvas instead of inside your synth is itself a container, and is the usual way to end up with a second one.
- Leave Sound Out outside the container. It’s the patch’s connection to your speakers, not part of the plugin — the container’s own audio output plug is what becomes the plugin’s output.
- Leave any Keyboard (MIDI) module outside too. It’s there to play the synth in the editor; keeping it outside is what leaves the container with a MIDI In plug, which is where the host delivers its notes once the plugin is loaded in a DAW.
A container wired that way has one MIDI input and one audio output on its exterior — the same two connections a DAW makes to an instrument plugin.
Exporting as VST3
Section titled “Exporting as VST3”- Go to File > Export Plugins…
- Choose a location to save the plugin
- Set the plugin name, manufacturer, and unique ID
- Click Export
SynthEdit generates a .vst3 file that you can install in your DAW’s plugin folder.
Exporting on Linux
Section titled “Exporting on Linux”The Linux build is an experimental preview, and export works differently there: VST3 export runs from the command line, not from the editor’s menu. The editor’s File > Export GMPI Plugin… produces a .gmpi bundle, which is SynthEdit’s own module format — not something a DAW loads. For a VST3, use SynthEditCL, the command-line tool that ships in the same tarball:
SynthEditCL MySynth.synthedit --autosavevst3The plugin is written to ~/.vst3/MySynth.vst3 — the per-user folder every Linux VST3 host scans, so there’s nothing to copy afterwards. Rescan in your DAW and it’s there.
The exported binary carries both a Wayland and an X11 path and picks whichever the host offers, so the same file works in an X11 host like Ardour and in a Wayland one.
The container’s name becomes the plugin’s name
Section titled “The container’s name becomes the plugin’s name”There’s no plugin-settings dialog in the Linux editor yet, so the name isn’t something you type at export time — it’s taken from the container you’re exporting. Name the container before your first export and the plugin, its bundle and its identifiers all follow from it.
Checking the result
Section titled “Checking the result”The plugin is a normal VST3 bundle, so the usual tools apply. Steinberg’s validator from the VST3 SDK is the quickest confidence check — it exercises the whole plugin API and reports what a strict host would object to. Then load it in a DAW and play it: a validator pass proves the plugin is well-formed, not that it makes the sound you meant.
If an export doesn’t produce the file you expect, SynthEditCL prints the reason and exits non-zero, and export_log.txt lists every module the plugin needs and whether it was copied in.
Including Audio, MIDI and SoundFont Files
Section titled “Including Audio, MIDI and SoundFont Files”If your project uses external files — a sample loaded by a Wave Player, a MIDI file driving a MIDI Player2, a SoundFont — those files need to ship inside the exported plugin too. SynthEdit looks for them in a folder next to your project named <project-name>.resources.
For example, if your project is MySynth.synthedit, create a folder called MySynth.resources alongside it and drop your .wav, .mid, .sf2, etc. files in there. When you pick one of those files in a module’s File Name pin, SynthEdit will find it in .resources/ first, then fall back to your global Audio / MIDI / SoundFont folders set in Preferences.
On export, the entire .resources folder is copied verbatim into the exported VST3 / AU bundle’s Resources folder. The plugin finds the files at runtime by the same short filename, so the patch just works in any DAW on any machine.
Why a dedicated folder?
Section titled “Why a dedicated folder?”Skin images and font assets get exported automatically — SynthEdit displays your GUI during export, which forces every panel control to register the images it needs. Audio, MIDI and SoundFont files can’t be discovered the same way (the audio engine doesn’t necessarily run during export), so putting them in .resources is the reliable way to make sure they travel with the plugin.
Testing Your Plugin
Section titled “Testing Your Plugin”- Copy the
.vst3file to your system’s VST3 folder —C:\Program Files\Common Files\VST3on Windows,~/Library/Audio/Plug-Ins/VST3on macOS,~/.vst3on Linux (where the export already puts it, so there’s nothing to copy) - Rescan plugins in your DAW
- Load the plugin on a track
- Test all controls and audio processing
Code-signing and notarization on macOS
Section titled “Code-signing and notarization on macOS”Before you share a macOS plugin with anyone else, it has to be code-signed and notarized. This applies to both the Audio Unit (.component) and the macOS VST3 — it isn’t optional, and it isn’t something SynthEdit can do for you.
SynthEdit signs exported plugins so they run on your own machine while you’re developing. That signature is not enough for distribution. Once a file has been downloaded — from your website, a mailing list, anywhere — macOS attaches a quarantine flag, and Gatekeeper refuses to load anything that isn’t signed with a Developer ID Application certificate and notarized by Apple. For an Audio Unit the failure is especially unhelpful: sandboxed hosts like Logic Pro and GarageBand simply won’t list your plugin, with no error explaining why. auval may pass on your machine and still fail on your customer’s.
What’s involved:
- Join the Apple Developer Program (currently US$99/year) and create a Developer ID Application certificate. There’s no free path to a distributable macOS plugin.
- Sign each bundle with that certificate, using the hardened runtime (
--options runtime) and a secure timestamp (--timestamp). Sign everything inside the bundle too — see below. - Notarize — upload the signed plugin (usually wrapped in a
.pkginstaller or.dmg) to Apple withnotarytool. Apple scans it and returns a ticket. - Staple the ticket to the installer with
stapler, so it validates even offline.
Sign the embedded modules too, from the inside out
Section titled “Sign the embedded modules too, from the inside out”An exported plugin isn’t a single binary. Any third-party modules your patch uses are copied into the exported .vst3 / .component, and on macOS each one is its own bundle with its own executable. Every one of those is code, and macOS validates all of it.
Signing only the outer bundle is the most common way to get a plugin that works perfectly on your machine and is rejected on everyone else’s — the outer signature is valid, notarization fails or Gatekeeper rejects the load because a nested binary is unsigned or signed with the wrong identity.
Sign inside out: every nested bundle, framework and dylib first, then the outer plugin bundle last. Each nested item needs the same certificate, hardened runtime and timestamp as the outer one. Signing the outer bundle first and the nested code afterwards invalidates the outer signature, so the order matters.
A note on codesign --deep: it looks like the shortcut for exactly this, and Apple recommends against using it to sign — it applies one set of options to everything it signs (nested code often needs different entitlements), and it only finds nested code where the system expects code, so anything tucked into a data location is skipped silently. Apple engineer Quinn’s “--deep Considered Harmful” is the short version. Use --deep only to verify:
codesign --verify --deep --strict --verbose=2 "MySynth.vst3"That’s the check worth running before you notarize — it walks the whole bundle and names any nested item that isn’t properly signed. spctl -a -vvv -t install on the finished installer confirms Gatekeeper’s verdict.
Two references worth reading before you start:
- How to code sign and notarize macOS audio plugins in CI — Sudara’s walkthrough, written specifically for audio plugin developers. It covers the certificate types, the exact
codesign/notarytool/staplerinvocations, and the mistakes that produce silently-missing AUs. - Apple: Notarizing macOS software before distribution — the official reference.
The whole sequence automates well. If you’re already publishing releases from CI, see Distributing plugins with GitHub Actions for where the signing and notarization steps slot in.
Windows has a parallel-but-milder problem: nothing blocks an unsigned plugin outright, but SmartScreen and antivirus scanners will flag it. See the FAQ on virus warnings.
Distribution
Section titled “Distribution”You own full rights to the plugins you create with the licensed version of SynthEdit. You can:
- Distribute plugins for free
- Sell them commercially
- Include them in commercial products
No royalties or additional licensing fees apply.
Automate your releases — rather than exporting and packaging by hand each time, you can have GitHub Actions export the plugin and build Windows + macOS installers automatically whenever you push a version tag. See Distributing plugins with GitHub Actions.
Tips for Professional Plugins
Section titled “Tips for Professional Plugins”- Test in multiple DAWs (Cubase, Ableton, FL Studio, Reaper)
- Provide sensible default preset values
- Include a user manual or preset library
- Test with different sample rates (44.1kHz, 48kHz, 96kHz)